Preamble
Here I will provide some general guidance about scientific writing, primarily reflecting my own opinions/biases. Hence, this material is most useful for PhD students in my lab, however some of it may be useful more generally.
To start, the most important advice: Write! Write! Write! Writing is a skill that gets developed through careful repetition, and you will only get good at it if you keep doing it. Practice as often as you can, whether you write scientific text, or fiction, or even an email or text. Just like developing other skills, it is important for your practice to be deliberate. As a music teacher told my son:
"Practice makes perfect" is inaccurate. "Practice makes permanent". The correct saying should be "Perfect practice makes perfect."
Irrespective of what you write, follow the full process, from outlining the ideas and order in which you will present them, fleshing out the text, using correct spelling and grammar, then re-reading, revising, and re-reading some more. Even when writing a text message. Definitely when writing a scientific paper.
Now, coming back to scientific writing. Before you delve into writing your next paper, make sure you have something interesting to say. To help students in my lab, I have put together a checklist that should apply for most types of papers. The goal of this checklist is to help you decide whether your paper will be of interest to a broader audience, i.e., whether your paper is, at first glance, publishable.
Once you have decided that you have something to say, make sure you say it in an effective way. That means that it’s not sufficient that you express your results and opinions in a way that makes sense to you (and perhaps others in the lab) but that you express yourself in a way that makes sense to the broad audience that will read your paper. It doesn’t matter what you say. It matters what others understand when they read what you said.
This is not the place to give you a full course on writing (technical or otherwise) and I am certainly not the most qualified person to teach such a course. Instead, I recommend a few starting resources. Note the emphasis on starting. You must constantly seek out to learn new tricks and improve your writing toolbox.
- They say, I say. by Gerald Graff and Cathy Birkenstein. A great book about writing that frames the writing process as a dialogue with others (that audience I mentioned above). The book also includes a collection of fill-in-the-blank templates that can help you cut through writer’s block.
- The science of scientific writing. by George Gopen and Judith Swan. American Scientist, 78, pp. 550-558. 1990. This is a great article that works in detail through how a thread of thought is developed from sentence to sentence in a scientific article.
- OWL/The Purdue online writing lab. This is an incredible resource on writing from Purdue University.
- Tandy Warnow’s guide to writing your first paper.
- 10 tips on how to write less badly. by Michael Munger. Published in the Chronicle of Higher Education, and hopefully will remain accessible without a subscription.
- Write like you teach. by James M. Lang. Book that is primarily about writing for the general public, framing the writing process as teaching the audience about the material presented. It contains great advice about how to structure and re-structure your text that’s useful even if you are not writing a book.
Table of contents
- Preamble
- Table of contents
- Using word processors
- Overall paper structure
- Accessibility
- The publishing process
Using word processors
Writing is not a linear process. You constantly write paragraphs and sections, delete some and insert others, and move text around to shape the story you are trying to make. The story you thought you were going to tell will invariably change as you read it through the eyes of a potential reader and find gaps in your arguments or an insufficiently clear thread of thought. To perform all this process, you need the right tools that will ensure that your constant tinkering doesn’t introduce mistakes and inconsistencies. Modern word processors provide many such tools, but you have to use these tools and use them properly. This is what I’m trying to convey in this section.
To LaTeX or not to LaTeX?
I would like to start by stating that I don’t use LaTeX and I strongly discourage my students from using it. My main reasons include:
- LaTeX is a technology that has stopped evolving since the 1990s. Modern word processors have evolved to a level where LaTeX is not really needed anymore. In particular, I find the equation editor in OpenOffice/LibreOffice to be quite good, and equations are one of the main reasons people have been pushing for LaTeX previously.
- Everybody knows how to use (at least at a basic level) a modern word processor. LaTeX requires a relatively steep learning curve. Using a modern word processor, thus, removes barriers to working across fields and academic levels (e.g., few high school students or biologists know LaTeX).
- Modern word processors have built-in features for checking grammar and spelling. Doing these checks in LaTeX requires more effort. Even if grammar/spell-checkers are imperfect, they are an invaluable sanity check, particularly for inexperienced writers.
- Modern word processors make it easy to include comments and highlight changes to a document. Again, this is difficult to do in LaTeX directly. Overleaf, the buggy “Google docs” for LaTeX, includes such features, but this now becomes yet another system that you have to log into and where you have to pay for premium features. Writing, particularly in an academic research lab, involves back and forth between co-authors and numerous edits, comments, etc. I have tremendously improved my writing by seeing the changes others made to text that I had written. The ability to easily annotate drafts is, thus, critical for developing one’s writing skills, and this ability is lacking in LaTeX.
Now, onto less opinionated points about the mechanics of writing.
Using styles
One nice feature of LaTeX is that it structures the text into a series of blocks, and the style of different types of blocks can be globally controlled. This makes it easy to change, for example, the font used in headings, all at once, without having to go through the whole document and fix each heading independently. This capability is now available in all text authoring tools, including word processors such as MS Word, OpenOffice, LibreOffice, etc., as well as in web authoring tools (including the one I’m using now). Yet many students (and faculty) continue to format their text by individually formatting lines of text.
IMPORTANT: Using headings, instead of mimicking headings by manipulating text properties, is very important for accessibility. See a longer discussion of accessibility considerations later in this document.
To make things more concrete, here is a screen shot:
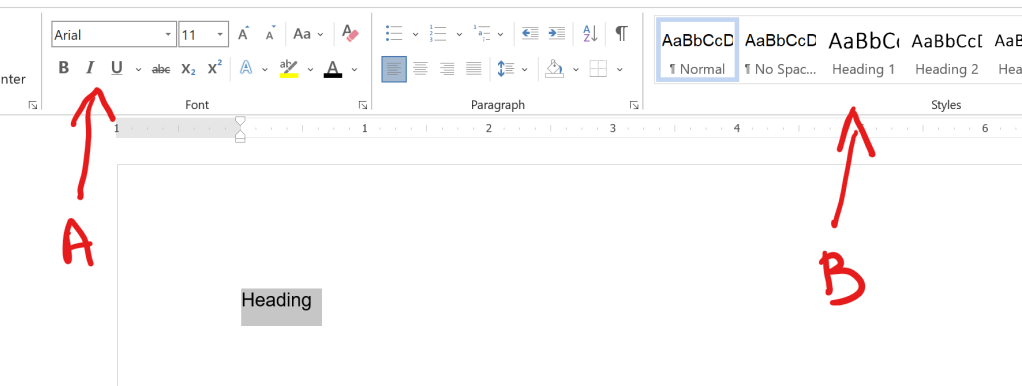
In the figure above, assume you are trying to make the text “Heading” be a heading for a section of the document. The incorrect way to do so is to access the menu marked with A in the figure, where you can change the font, size, color, style, etc. Yes, the text will look “the right way” but you’ll have to remember the combination of settings for all other headings of the same type, and it’s easy to make mistakes, which will make your text look unprofessional and may even confuse the reader. Plus, as I’ve already mentioned, if you change your mind about how the headings are formatted, you have to go through it, line by line, to change the formatting. Instead, head to the menu marked B in the figure and simply select the heading style you want. The styles are customizable, and you can change all instances of a style at once by simply editing the style.
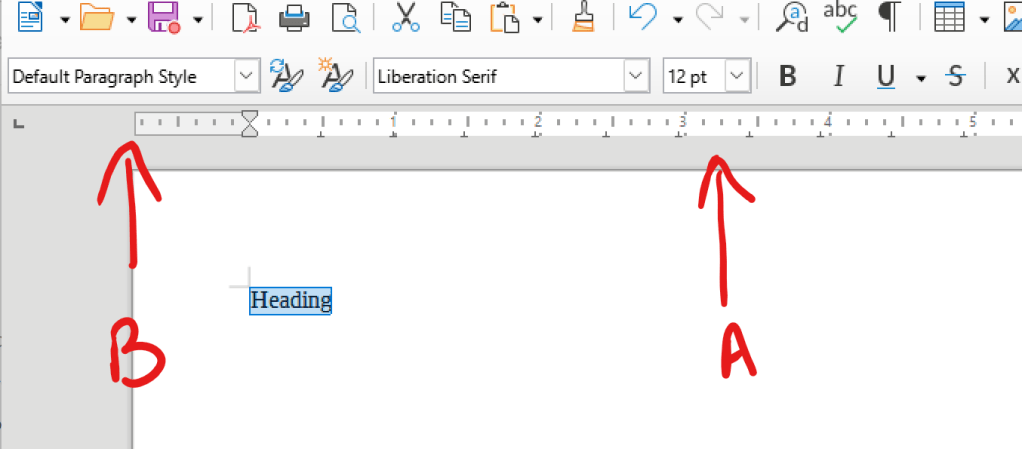
In LibreOffice, the menu looks different but contains the same functionality:
In short, make sure to always use styles to define the structure of the document. It will make your life easier and it will also make it easier for journals to reformat your paper to fit with their styles. It should also make it easier to convert between word processors and LaTeX, and vice versa, should it ever be necessary. And, it will make your document more accessible.
Cross references
Another feature that is frequently ignored when using word processors is the proper use of cross-references within the document. Most scientific papers contain figures and tables, and all of these building blocks must be properly captioned (more on that below) and referenced from the text. A very common mistake is to simply include text in the paper such as: “See Figure 1”. If you later decide to change the order of figures in the paper, then you must carefully check the paper to make sure you change the numbering in all the places where the figure is referenced, creating yet more opportunities for mistakes to creep into your document.
The better solution is to use the “cross-reference” feature available in most word processors. First, you must create a caption for your figure or table. You can do so by right-clicking on the image and selecting “Insert caption” from the context menu, in both MS Word and OpenOffice/LibreOffice. Then, when you are ready to reference the figure in your text, simply insert a cross-reference to the image/table. This cross-reference will automatically update if you reorganize your text and change the order (and therefore the numbering) of figures or tables.
In OpenOffice/LibreOffice, you can do so from the “Insert” menu which will then allow you to select what the reference text will indicate. The most common choice is “Category and number” which will generate the desired “Figure XX” text.
In MS Word, you find the cross-references in the “References” TAB. You will need to select “Only label and number” when describing the style of the reference in order to generate the desired “Figure XX” text.
Note that this is just a high level introduction to using cross-references in word processors. Please play with these features and also read the relevant documentation in order to become more familiar with their use. From now on, you should NEVER type in the number of a figure or table when referencing it in your manuscript.
Captions
Since we discussed referencing figures and tables, it is important to briefly discuss the captions you create for these display items in your papers. Too often I see captions that look like:
“Figure 1. Dot-plot of genome similarity.”
To understand what the figure really says, you now need to find a reference to it in the text, and hope the text clarifies it. A better practice is to provide sufficient information in the caption for a reader to interpret the figure without the help of the text. Such a description usually starts with a short title followed by a longer description.
“Figure 1. Comparison of the genome sequences of Genome A and Genome B. The dots represent segments of 500bp that are shared by the two genomes and the x and y coordinates represent the location(s) in the two genomes where the segments are located.”
Better yet, tell the reader what they should get from the figure.
“Figure 1. Comparison of the genome sequences of Genome A and Genome B. The dots represent segments of 500bp that are shared by the two genomes and the x and y coordinates represent the location(s) in the two genomes where the segments are located. The X pattern in the middle indicates a large (~10kbp) genomic inversion.”
Note that in all the examples above, the caption no longer includes a technical description of the type of plot used. Referring to the figure as a “dot plot” is ultimately irrelevant to the message the figure is trying to convey. Dot plots can convey different messages and there are also messages that dot plots cannot convey. Saying the figure is a dot plot is no more useful than saying that the figure was created using colored lines and an Arial font. Accurate but irrelevant.
Managing citations
As in the case of figures and tables, the best way to manage citations is to have the references linked to the bibliography and automatically updated as you add and remove references. Word processors cannot do that by themselves. LaTeX can, through the BibTeX system, however this involves a largely manual process of building paper-specific files of references and remembering the specific identifier assigned to each reference whenever you need to cite it. You can get good at this, but even then, it takes a bit of time. Wouldn’t you rather spend that time shaping the story presented in your paper?
There are a number of citation managers that work with many word processors and multiple platforms. Some of the most widely-used options are EndNote, Mendeley, and Zotero. I currently prefer to use Zotero, both because it has a robust set of features (now exceeding the capabilities of EndNote), and because it is free. Zotero works well for both MS Word and OpenOffice/LibreOffice and also integrates with Google Docs. It is also a good repository for keeping track of the papers you have cited or read. As an aside – you should not cite a paper you have not (carefully) read.
A last citation manager that is becoming popular is paperpile, and it is specifically designed to work with Google Docs, i.e., it only operates in the cloud. Like many other cloud offerings (including Overleaf), beyond basic usage it tries to push you into subscription fees. Furthermore, you can only collaborate with people who also use paperpile, while other citation managers are better at interoperability. I have seen no evidence that paperpile can effectively manage citations in a way that is compatible with most journals’ requirements, and thus strongly discourage students from using this system for any publishable work.
When to use and not to use the cloud
Back in my day, writing a paper collaboratively involved sending around annotated versions of the manuscript from author to author. More and more, writing is done collaboratively through cloud services, like Google Drive. A major advantage is that multiple authors can work together on the text at the same time, speeding up the writing process. Even if early on in the writing process people may actually work in parallel on the document, in practice, though, authors still take turns editing, and simply having your document in the cloud does not eliminate the need to carefully coordinate between authors.
There are some drawbacks to using the cloud. First and foremost is that the cloud editors (which are javascript code running in your browser) do not come even close to matching the functionality of stand-alone word processors, and frequently there are inconsistencies between what you see on the screen and what gets printed out (i.e., what a journal will see when you submit the paper). Any time you have to work within page limits it’s better to download a version of the document locally and make sure that it has the appropriate format. For scientific papers that you plan to submit to a journal, you should only use Google Drive for early drafts, then work in a word processor.
A second drawback to using the cloud is that, by default, it is not obvious what changes different people make to the text. It’s easy to re-read a 1-page report before submitting it to make sure the multiple people who edited it didn’t introduce errors or inconsistencies. It’s almost impossible to do so for a 12-page technical paper with the associated figures, appendices, supplementary material, etc. Furthermore, unless people highlight how they edited your writing, it will be hard for you to learn how to improve. Thus, even when using the cloud, I recommend that people make their edits in “suggestion” mode so that the changes are explicit to the lead author.
Collaboration conventions
Only one person is responsible for the content of the paper. Period. Irrespective of the number of authors. Who is this person needs to be explicit from the beginning. It could be the PI, or one of the students, or one of the collaborators. Irrespective of who it is, it is their responsibility to read, re-read, re-re-read the text to make sure formatting, spelling, grammar, etc. are correct and consistent throughout the manuscript. This is the person who, at the end of the writing process, places a “freeze” on the collaborative writing process, and becomes the sole owner/gatekeeper of the manuscript. Irrespective of how you started writing, at the end of the process, the “owner” of the manuscript will circulate it among the authors as an email copy, then receive and reconcile the edits, and repeat the process until all authors are comfortable with the submission of the manuscript.
I stress: All authors must read and agree with the manuscript being submitted.
To avoid confusion, it is best to version the document files being sent around. A simple way to do so is to include the date in the name. Using the format YYYYMMDD also creates a string that can be sorted lexicographically (i.e., the way most file managers do) in a way that matches the age of the manuscript. Each author making changes to the manuscript can add their initials to differentiate their version from the others circulating around. For example, assume you are writing a paper creatively named MyPaper.docx and you send it out to co-authors on May 12, 2022. You should rename your version: MyPaper20220512.docx. Now, once I read it and make a number of changes, I will return MyPaper20220512-mp.docx. You can now distinguish the file I sent you from the one Donald Knuth edited, which would be called MyPaper20220512-dk.docx.
If you are in my lab, please do the same even if sending around a PDF compiled from LaTeX. Also, just like coding, please name the file something more creative than “paper” (or “main” as I frequently see in the LaTeX world) so that it’s immediately clear from the name what paper we are talking about. As a graduate student, this paper may be the only one in your life, but for your co-authors, it may be one among many. A good practice is to include your name in the file name, e.g., Pop_WABI2022_20220512.docx.
Overall paper structure
Below I have a brief discussion about the typical sections that form a paper. I am not going to discuss in here the order in which they should appear in the manuscript (which varies by manuscript type and journal), nor is this a full manual of how these sections should be created. Please refer to the resources at the beginning of this page if you are looking for help in crafting your text.
Note that each section in the paper has a specific purpose, but it’s OK to discuss certain things in the “wrong” section as long as it’s done with the goal of helping the reader understand the paper. For example, brief references to methods can occur in the results section even though the full details are also presented in the Methods section. Be careful, however, not to over-do this, and largely keep the points you make in the relevant section.
Abstract
The abstract is what most people will read from your paper. This is what will sell people on whether they should read the paper in more detail or not. This is also what makes journal editors and reviewers form a first (and perhaps decisive) opinion about your work. Thus, the abstract has to be written very carefully. Here you have to make the case for why your paper is relevant, and outline what people will learn from it. It essentially summarizes the information that you worked through when filling out the checklist before deciding whether it’s worth writing the paper.
Introduction
The introduction has to set the stage for the reader by defining the impact of the work you are about to present, and helps the reader appreciate the innovation over the state of the art that your work represents. The introduction can also include some idea about how you’ll frame your arguments, particularly if you are going to make the case for your work in an unusual way (e.g., a new type of experiment or setting)
Importantly, do not end the introduction with a “table of contents” as I too often see: “We start with a background, then describe the algorithm in section 2, then show some results and conclude with a discussion”. Don’t all papers do this? Tell me something surprising.
Background
The background is sometimes included in the introduction itself, and provides the reader with a description of the state of the art as well as with the definitions/vocabulary needed to understand the rest of the paper. Like everything else in the paper, the background has to be carefully crafted to align with the key message of the paper. Thus, when discussing prior research in the field, don’t just simply say what this prior work did, but focus on the aspects of the prior work that are relevant to your paper, and highlight the gaps in this prior research that are targeted by your work. The background should not read like a comprehensive review of a field.
Methods
The methods section describes, in detail, the methods used to generate the results presented in the paper. If your paper is mostly about the results of some experiment, the methods section tends to be fairly dry and very specific, as it provides the details necessary for others to reproduce the results of your experiments. When using software, it is important to include version numbers and also specify the parameters used if they differ from default settings. To help the reader, it is useful to use sub-headings aligned with the experiments described in the results section.
If the paper describes a new method, then the methods section gets to be a mini-paper on its own, as you describe the new method in detail but also provide relevant background or highlight experimental results whenever necessary to help the reader to understand your choices. Of course, in addition to your new method you will also have to include the details necessary to reproduce the results presented in the paper.
Results
Here you report the results of the experiments you ran. It’s useful to present these results in a way that supports the story you are trying to tell. You should also include a bit of information about the experimental design and methods used to generate the results, particularly when such information is important for interpreting the results presented. Full experimental design and methods information should still be presented in the Methods section. You can also briefly editorialize, but lengthy discussions should be presented in the Discussion section. By and large, you want the results section to describe the objective picture of what your experiments revealed, and your subjective interpretation gets included in the Discussion.
The way you present results must be precise – include the relevant units and actual measurements of confidence/accuracy (such as p-values, correlation coefficients, etc.). You should not make imprecise statements or qualitative assessments not directly supported by numbers. For example, if you say “we see significantly more widgets of type A than B”, then you better have the statistics to support the word “significant”. You should also present your data in a consistent way that allows readers to compare different figures. This means that you need to use consistent scales, colors, styles, etc.
Also, be only as precise as necessary. Saying a genome is 1,001,347 bp is the same as saying that the genome is 1Mbp in length, yet the former includes a level of specificity not relevant to the story, and the latter is easier to read and interpret. Numbers should always include thousands separators (and justified right in tables), again to make it easier to compare them to each other.
Discussion
Here is your chance to interpret what the results say and to shape the main story of the paper. What you say here has to focus on “surprise” – tell the reader something that they may not have known before reading your paper and before seeing your results. Place your results in the context of what people knew before your work (i.e., what’s in the Background section). Here you can also discuss the limitations of your data, methods, experiments, etc., and qualify your message with the appropriate context.
Conclusion
The conclusion is sometimes included with the discussion. It simply summarizes what you want people to get from your paper. Don’t repeat what you just said, or provide another table of contents for the manuscript.
Supplementary material
If in doubt, do not include anything in supplementary material. Why? You can read more in this paper:
Use and mis-use of supplementary material in science publications. Pop and Salzberg. BMC Bioinformatics, 16, 2015.
Most importantly, you should not even consider supplementary material until the manuscript is completed, carefully edited, and you are ready to format it for submission to a journal. If a figure, table, or paragraph are relevant to the story you are making, it should be in the main manuscript. If it is not relevant to the story you are making, then it shouldn’t be in the manuscript at all, even in supplementary material.
Once you start cutting down the text to fit within a page limit, whether the limit is determined by the journal or by the human attention span, the first thing you should do is to delete text/figures, not move them to the supplementary material. Only once all non-essential information has been removed, if you are still over the page limit, you can consider moving some segments of your paper to supplementary material. This material must be referenced from the main paper (after all you decided it is relevant to the main story), and must be referenced as specifically as possible. In other words “See Section 2.1 in Supplementary Material” is strongly preferred over “See Supplementary Material”.
Accessibility
It is both a good practice, and a federal mandate, that documents and websites meet certain standards intended to make the material accessible to individuals with disabilities. Specifically, the current expectation is that all academic webpages meet the Web Content Accessibility Guidelines (WCAG) version 2.1 to levels A and AA. The goal here is not to rehash exactly what these standards describe, but to highlight some general practices that you can use to ensure the documents you create are accessible. For more information about web/electronic accessibility, please refer to the Web Accessibility Initiative’s Accessibility Fundamentals Overview.
Importantly, just like other accommodations made in the name of accessibility (a common example are curb cutouts and ramps at the entrance of buildings), making your documents more accessible will also make them more usable for individuals who do not have disabilities. In other words, the principles outlined below are broadly good practices one should follow to enhance the usefulness of documents.
Principle 1. Non-textual elements should have a textual description
Any image/figure included in a website or document should have an “Alternate text” tag (ALT tag) describing what the image/figure contains. A well-written caption is a valid replacement for the “ALT tag”, but make sure that it is obvious which caption is associated with which figure. As described earlier in this document, don’t simply write text and call it the caption for a figure, rather use the “Add caption” function of the word processor to create a caption that is automatically tagged so it can be cross-referenced from the text, and also that is formatted in a way that makes it obvious it is a caption (i.e., using the caption “style” of the word processor).
Nowadays, AI tools can generate reasonable ALT tags, however make sure you review and edit the tags as the automatically generated tags frequently miss nuance. Less relevant for writing – web accessibility also means that any video needs to be captioned. Again, AI-generated captions are a helpful start but do require a substantial amount of editing to ensure they accurately describe the contents of the video (particularly for technical content).
Principle 2. Color should not be the primary conveyor of information
As much as possible, plan for your figures to be “understandable” even if viewed in grayscale, and at low resolution (e.g., a poorly-photocopied version). Unfortunately, the plotting tools provided by Python/R/etc. default to colors to separate out different data “series”, thus you must intentionally change the way the data are presented to ensure that the different data items can be distinguished from each other even without color. This can be achieved, for example, by using symbols to highlight the different lines in a line plot, or by making clear distinctions in the intensity of the color between different bars in a bar plot. Note that just by using symbols you are not guaranteed to make your figures more accessible. For example, a visually-impaired individual may have difficulties distinguishing between symbols x, +, and * . Generate your figure, print it out at different resolutions, then share it with friends to make sure the message is clear.
If you feel that color would make the plot “prettier”, then use a color-blind accessible palette. See this blog post for some considerations, but do spend some time searching for other resources on the internet on this topic.
Principle 3. Clearly highlight the document structure
I mentioned this above already – make sure that all headings are properly tagged in the document using the tools provided by your word processor. Sections, subsections, sub-sub-sections, etc. must be tagged as such. Simply changing the font size is not sufficient. The same goes for lists – use the “list” button in your word processor to create a list, rather than entering numbers by hand. Also, make sure that the outline of your document makes sense (most word processors allow you to see just the outline, based on the way in which you tagged the different headings). All of these features make it easier for assistive tools to understand the document and to present it to an impaired reader. All of these features also make it easier for your text to be published in different formats: as a “traditional” PDF paper, as a website, or within an e-reader that works equally well on a tablet or on a small phone.
Your text should “work” even if someone decides to substitute fonts or increase/decrease the size of the font. For the text to be able to “flow” as the viewing window or font size is changed, it is important to avoid doing your own typesetting (e.g., by adding boxes within the text), rather keep the text flowing linearly, from section to section.
The publishing process
As a final section of this document, I want to provide a bit of information about the scientific publishing process – how you interact with conference chairs, editors, and reviewers, and what to expect as far as the document you are creating is concerned.
You will submit the paper to a journal or conference, following carefully the formatting instructions provided. Make sure to follow the instructions closely. Some conferences will simply reject your paper if it is not properly formatted. Journals are typically more lenient, and many journals allow you to submit papers that are not formatted according to the journal’s style. If that is the case, make sure you format the paper including figures in-line (as close to a typeset version as possible) so that it’s easy for reviewers to read the paper. Speaking of legibility – left-justify all text. It is much easier to read than fully justified text.
An editor or program committee members will screen your paper and decide whether it should be evaluated more thoroughly. Some papers are rejected simply based on the decision of an editor that the paper is out of scope for the publication venue, or the editor didn’t feel the paper is interesting enough.
Papers not rejected in this first stage are then sent to several reviewers, typically 2-3 for journals, and frequently more for conferences. They will return a set of reviews that entail both major comments/criticism (items that significantly impact the publishability of your work) and minor ones (typically typos, small clarifications, etc.). A recommendation on whether your paper should be accepted is typically submitted directly to the editor of the journal or the program committee of the conference. Some conferences provide this recommendation to the authors as well, but at journals typically only the editor sees the recommendation.
At this point, the editor or program committee can decide to accept or reject your paper, or to request edits before making a decision. This latter situation is the most common for journals and some conferences. Many conferences decide on acceptance/rejection on the basis of a single round of reviews.
If you are asked to make changes to your manuscript, please make sure to carefully address the reviewers’ comments. As I also discuss in the paper writing checklist, you should try to respond to the comments by making changes to the manuscript, not by arguing with the reviewer about the validity of their comments. I have personally rejected multiple papers when the authors started debating with the reviewers. You will typically be asked to submit both a revised manuscript and a point-by-point response to the reviewers’ and the editor’s/program committee’s comments. Please keep these responses brief. If possible, most the responses should have the form: “Thank you for your feedback. This has now been corrected in the manuscript”. Under no circumstance (at least not before discussing with me) should any response to reviewers be longer than a short paragraph (3-4 lines of text at most).
When revising a manuscript, you will frequently be asked to highlight the changes made to the manuscript in response to the reviews. Typically, these are highlighted by changing the font color, e.g., to red, for all the new text. Alternatively, you could make your changes in “track changes” mode, or perform a ‘diff’ between the revised and original manuscripts. In MS Word this can be done with the “Compare documents” function. In the response to reviewers you also have to clearly indicate the difference between the reviews themselves and your responses. You can use color to make this distinction (though I would recommend against using red for this purpose), but a better choice is to use indentation and/or font type changes (e.g., keeping your responses in italics and justified with respect to the reviewer’s comments).
Once the editor or program committee receive your revised manuscript, they will screen your responses and decide whether to accept or reject the manuscript, or whether to involve some or all of the reviewers in this decision (i.e., to re-review your manuscript). For conferences, this is typically the last step in the review process. Your paper will be accepted or rejected after one round of reviews. At journals, you may get new comments from the reviewers and the editor may ask you to further revise the paper. It’s uncommon that you will go through more than two rounds of review, but exceptions do occur.
Once your paper is accepted, your job is not yet done. You may be asked to provide a final version of the manuscript that addresses final comments from the editor/program committee and that follows the conference’s/journal’s style. If you didn’t originally format your paper according to the required style, this will be the time to do it. IMPORTANT: you will typically receive a very short deadline to finalize your manuscript. This is “all hands on deck”/”drop everything else” time to ensure you meet this deadline.
For conferences, your journey ends here, unless you are invited to submit a journal version, in which case you pretty much get to start the whole process from the beginning (kind-of – usually the reviews from the conference are sent to the journal which then can do an expedited review).
If you submitted the paper to a journal, there’s one final, but very important step, that will take place. The journal’s printing/typesetting office will carefully typeset your manuscript into its final format (the exact way it will appear on the printed page). In the process, they may change some of the wording, and they may identify things that you need to correct before publication. Thus, the journal will send you the “proofs” of your manuscript – the fully formatted document annotated with the typesetter’s questions. You will usually have between 24-48 hours to carefully check that the manuscript was correctly conveyed into its new form (and you can highlight typos and other small changes that you think need to be made), and to answer all the questions of the typesetters. Again, this is “all hands on deck” time, since missing the publisher’s deadline could result in substantially delaying the publication of your article, and cause significant disruption for the publisher.
Now, you can finally breathe, and enjoy re-reading the fruits of your labor appearing in print in a journal or conference proceedings.
Occasionally, you’ll also discover a blatant error that somehow survived the grueling process described above and that will now be forever etched in print. It does happen to the best of us – join the club. Some errors will feel embarrassing but not impact the scientific validity of your work. Others may require a correction to be published, or, in the worst case, a retraction. It is best if you initiate such processes rather than hoping nobody will find the error. Your life will get more complicated if others do find the error and ask the journal to retract your work.
